Overview #
The AI Images feature in Outfy helps you create professional, high-quality product visuals using AI. You can enhance existing images, generate styled backgrounds, or create studio-like product shots—without needing design skills or photography setup.
These images are ideal for Etsy, Shopify, Instagram, ads, and other marketing channels.
Accessing AI Images #
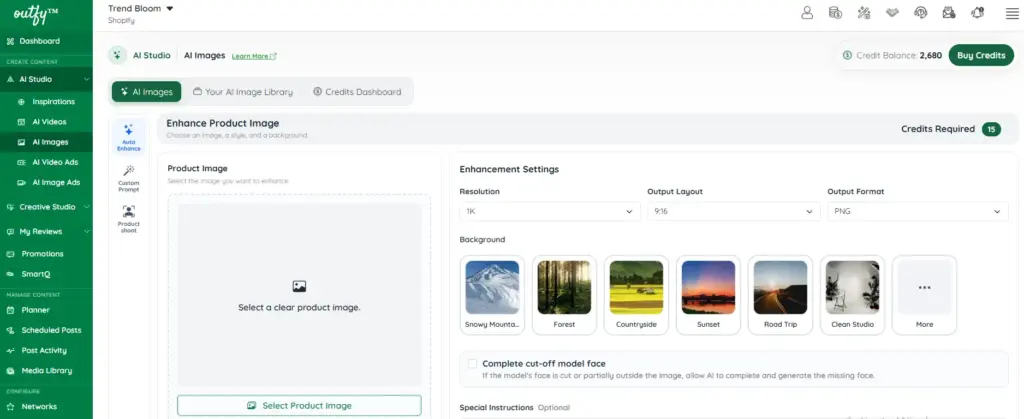
You can access the AI Image tool from the Outfy dashboard by navigating to:
Dashboard → AI Studio → AI Images
Inside this section, you’ll find:
- Auto Enhance
- Custom Prompt
- Product Shoot
- Your AI Image Library
- Credits Dashboard
Create an AI Image #
To generate an AI image, you must first select a product image that will be used as the primary subject of the image.
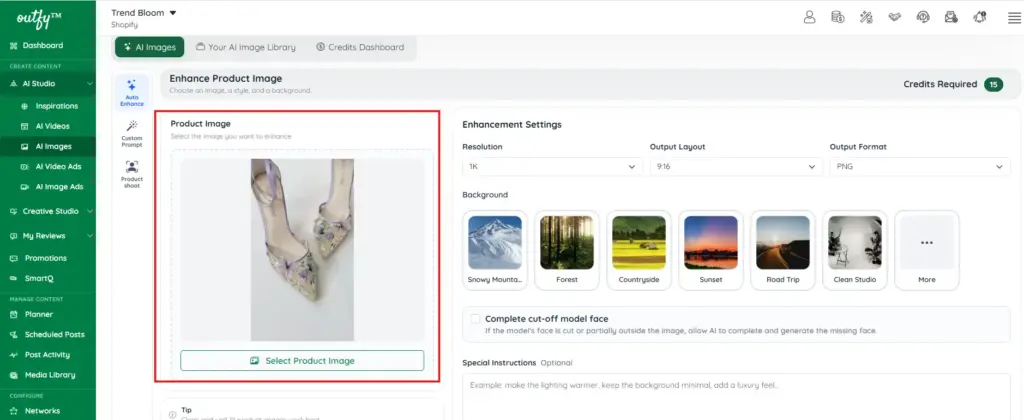
For best results, it is recommended to use:
- High-resolution images
- Clearly visible products
- Clean or minimal backgrounds
- Images without heavy text overlays
Image Modes #
The Image Modes in Outfy allow you to create AI images in different ways depending on your needs. Each mode offers a different level of control, and customisation to help you generate the best possible product visuals.
You can choose from the following modes:
- Auto Enhance
- Custom Prompt
- Product Shoot
Each mode is designed for a specific use case, whether you want quick improvements, full creative control, or professional product-style images.
Auto Enhance #
Auto Enhance is designed for quick and automatic improvements to your product images. It simplifies the process by applying intelligent enhancements without requiring manual input.
- Better lighting
- Clean backgrounds
- Professional styling
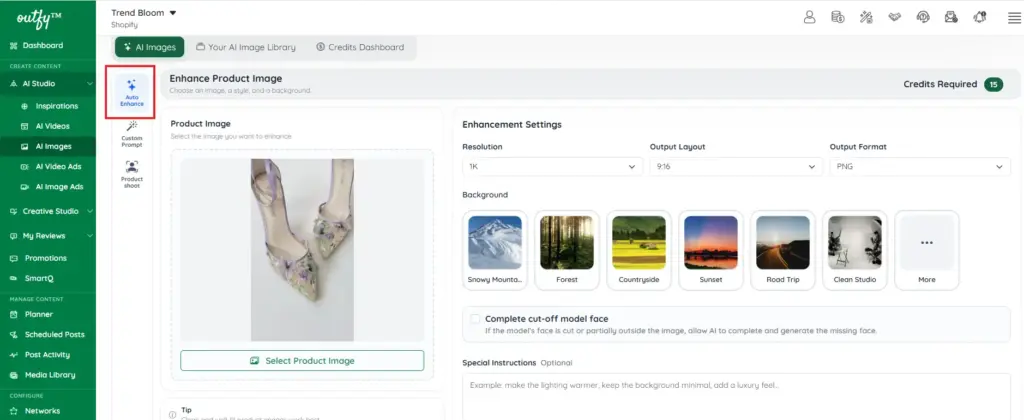
Enhancement Settings
Resolution
Choose from multiple quality levels to control image clarity and detail. Higher resolutions give sharper results for professional use, while lower options are faster to export.
Output Layout
Select different aspect ratios based on use case, such as vertical, square, or landscape formats for social media, ads, or websites.
Output Format
Pick the file type for export (e.g., JPG or PNG). JPG is smaller and faster, while PNG offers higher quality and supports transparency.
Choose Background
You can either select a ready-made background or create your own custom scene to match your brand style.
Preset Background Categories:
- Nature & Landscapes – forests, mountains, greenery
- Water & Beach – ocean views, pools, sandy shores
- Sky & Light – sunsets, bright skies, glowing effects
- Seasonal – winter, festive, autumn themes
- Lifestyle & Travel – real-life settings like cafes, streets, homes
- Studio / Product Safe – clean, minimal backgrounds for a professional catalog look
Custom Background:
If you have a specific vision, you can describe your own background using a simple prompt. For example: “premium shopping mall,” “luxury hotel lobby,” “modern kitchen counter,” or “colorful party backdrop.” The AI will generate a scene based on your description, giving you more creative freedom and helping you match your brand identity or campaign theme perfectly.
Complete Cut-Off Model Face
If the model’s face is cut or partially outside the image, AI can intelligently complete and generate the missing face for a more natural and polished result.
Special Instructions (Optional)
Add any extra directions or preferences to further customize the final image according to your needs.
Logo Overlay
Add your brand logo across all frames for consistent branding.
- Choose where your logo appears on the video — Top Left, Top Right, Bottom Left, or Bottom Right.
Generate The Image
After customizing your Auto Enhance settings, click Generate Image. Your AI image will be ready in seconds.
Custom Prompt #
Gives you full control over how your image looks.
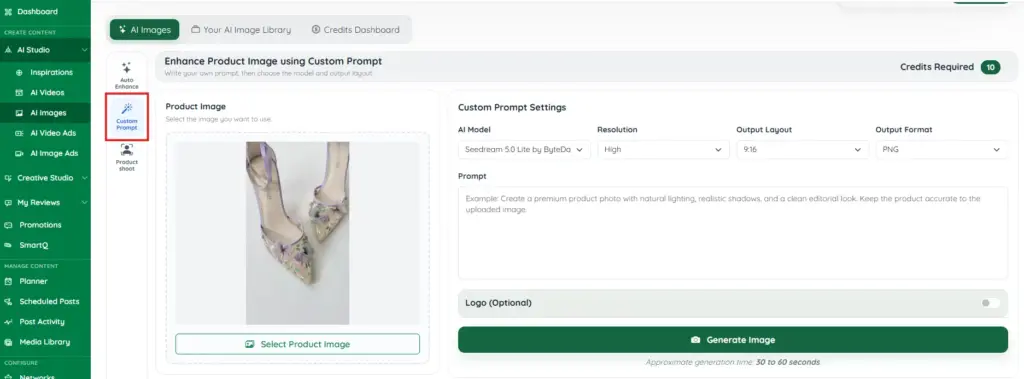
Custom Prompt Settings
- Select an AI model
- Choose the resolution
- Output layout
- Output format
Custom Prompt
Example prompt:
“Create a premium product image with soft natural lighting, minimal background, and a luxury aesthetic.”
Best for advanced users who want precise creative control.
Logo Overlay
Add your brand logo across all frames for consistent branding.
- Choose where your logo appears on the video — Top Left, Top Right, Bottom Left, or Bottom Right.
Generate The Image
After customising your Image with a custom prompt and settings, click Generate Image. Your Custom AI image will be ready in seconds.
Product Shoot #
Create studio-quality product images without a physical photoshoot. This mode gives your products a realistic, professional look—perfect for eCommerce, ads, and social media.
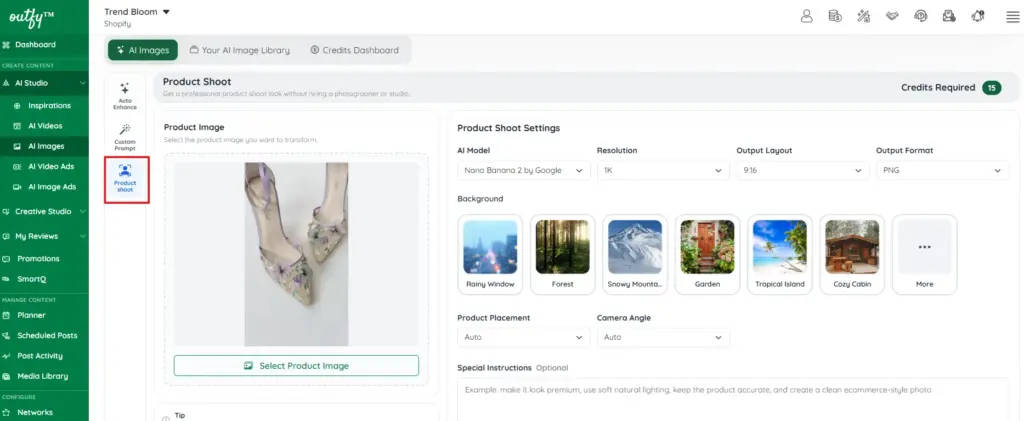
Product Shoot Settings
- AI Model
- Resolution
- Output Layout
- Output Format
Background Options
Choose from realistic scenes like Urban Street, City Skyline, River Bank, Cloudy Sky, Resort Poolside, Ocean View, and more.
Custom Background:
If you have a specific vision, you can describe your own background using a simple prompt. For example: “premium shopping mall,” “luxury hotel lobby,” “modern kitchen counter,” or “colorful party backdrop.” The AI will generate a scene based on your description, giving you more creative freedom and helping you match your brand identity or campaign theme perfectly.
Product Placement & Camera
This section lets you control how your product is positioned and viewed in the image. Choosing the right placement and camera settings helps present your product in a way that aligns with your brand and purpose.
Product Placement
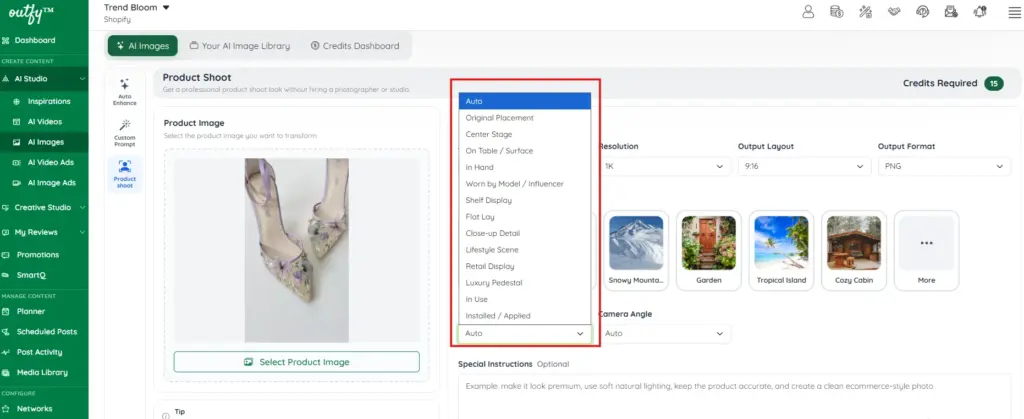
Product Placement defines how and where your product appears within the scene. Instead of leaving it entirely to AI interpretation, you can guide the output by selecting a placement style from the dropdown.
Available Options:
- Auto
Automatically selects the most suitable placement based on your product and background. - Original Placement
Keeps the product in its original position from the uploaded image with minimal changes. - Center Stage
Places the product prominently in the center, ideal for highlighting it as the main focus. - On Table / Surface
Positions the product on a flat surface like a table or countertop—great for food, decor, or retail items. - In Hand
Shows the product being held by a person, adding a natural and relatable feel. - Worn by Model / Influencer
Displays the product as worn or used by a person (e.g., clothing, accessories).
Use case: As seen in a real example, selecting this option helps the AI understand how the product should appear when worn, resulting in a more natural and realistic presentation compared to generic placement. - Shelf Display
Places the product on a retail-style shelf, suitable for store-like visuals. - Flat Lay
Arranges the product on a flat surface viewed from above, commonly used for aesthetic or social media-style shots. - Close-up Detail
Focuses on specific parts or details of the product for a more zoomed-in, high-detail look. - Lifestyle Scene
Integrates the product into a real-life setting to show it in use or in context. - Retail Display
Mimics a commercial or storefront display setup. - Luxury Pedestal
Places the product on an elevated platform for a premium, high-end look. - In Use
Shows the product actively being used in a natural scenario. - Installed / Applied
Displays the product as already installed or applied (e.g., home decor, wall items, cosmetics).
Tip: Clearly defining product placement (instead of leaving it on Auto) gives you more control and usually results in better, more accurate images.
Camera Angle
Camera Angle determines the perspective from which the product is viewed. Choosing the right angle helps highlight key features and improves visual appeal.
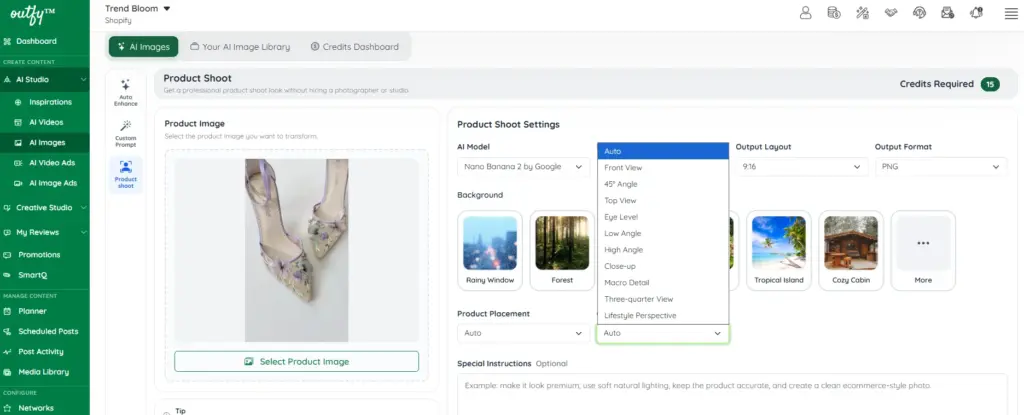
Available Options:
- Auto
AI selects the most suitable angle automatically. - Front View
Straight-on view of the product—ideal for catalogs and eCommerce listings. - 45° Angle
Slightly angled view to add depth while still keeping the product clearly visible. - Top View
Shot from directly above—perfect for flat lays and layout-style compositions. - Eye Level
Natural, human-eye perspective for a realistic look. - Low Angle
Shot from below, making the product appear larger and more powerful. - High Angle
Shot from above at an angle, giving a broader view of the scene. - Close-up
Zoomed-in view to emphasize textures, details, or key features. - Macro Detail
Extreme close-up for very fine details (e.g., fabric, texture, finishes). - Three-quarter View
Balanced angle showing multiple sides of the product, commonly used in product showcases. - Lifestyle Perspective
A more dynamic, real-world angle often used in storytelling or lifestyle scenes.
Special Instructions (Optional)
Add prompts for lighting, mood, or styling.
Ideal for creating polished, eCommerce-ready visuals with minimal effort.
Logo Overlay
Add your brand logo across all frames for consistent branding.
- Choose where your logo appears on the video — Top Left, Top Right, Bottom Left, or Bottom Right.
Once you’ve finished customizing your Product Shoot Mode settings, click Generate Image. Your AI image will be created within seconds, ready to download and share.
AI Image Library #
All generated images are stored in your AI Image Library.
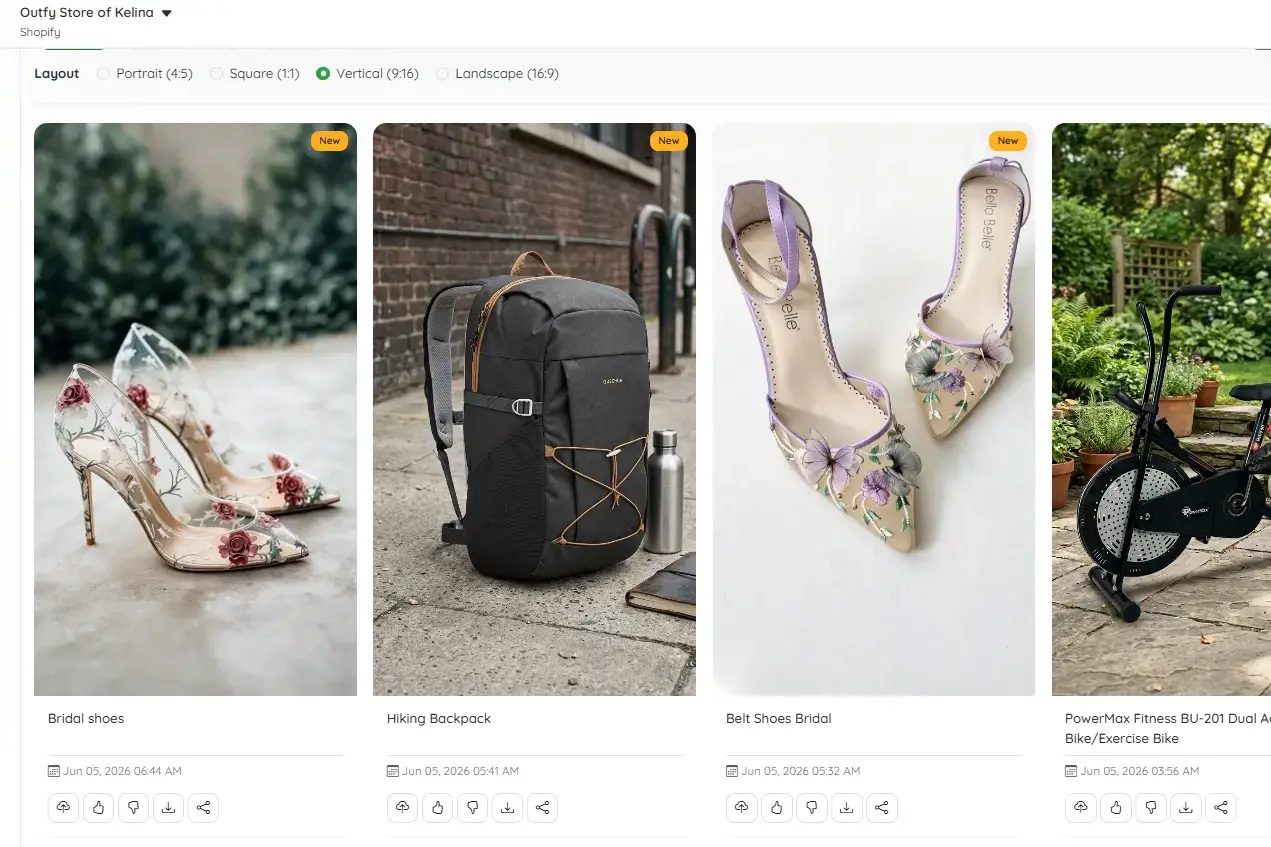
From here, you can:
Reuse for posts or listings
View created images
Download images
Credits Dashboard #
AI Images works on a credit-based system.
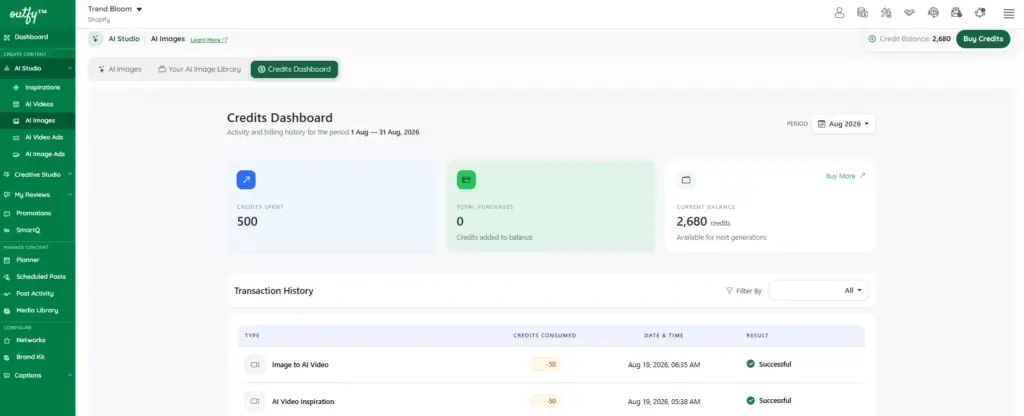
You can check your:
- Available credits
- Usage history
From the Credits Dashboard or AI Images page.
Frequently Asked Questions #
Can AI images be created in a specific style?
Yes. AI images can be generated in a specific style or according to your preferred theme. To achieve this, use the Custom Prompt option and provide a detailed description of the style, theme, or visual elements you’d like the AI to follow. The more specific your prompt, the more closely the generated image will match your desired style.