Introduction #
Outfy makes it easy to launch a Summer Sale promotion to boost visibility and sales during the sunny season. This guide shows how to create and schedule a themed promotion using Outfy’s automation tools.
For a complete overview of promotion setup, refer to the full Create Promotion guide.
Go to Promotions #
From your Outfy dashboard, click on Promotions from the left menu.
Under Choose a Promotion Theme, scroll to the Occasion section.
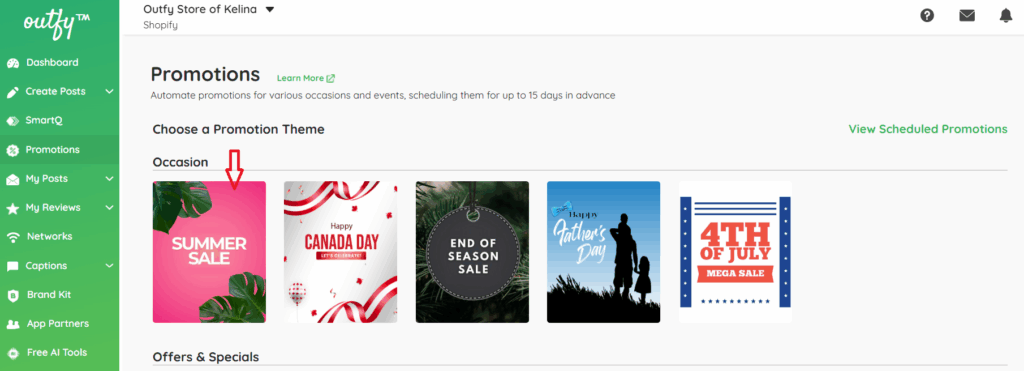
Click on the Summer Sale theme.
This theme includes pre-made templates and visuals tailored for summer, helping your posts feel seasonal and eye-catching. Browse all our sales campaign templates here!
Choose What to Promote #
After selecting the Summer Sale theme, Outfy will ask you what you want to promote. You have three options:
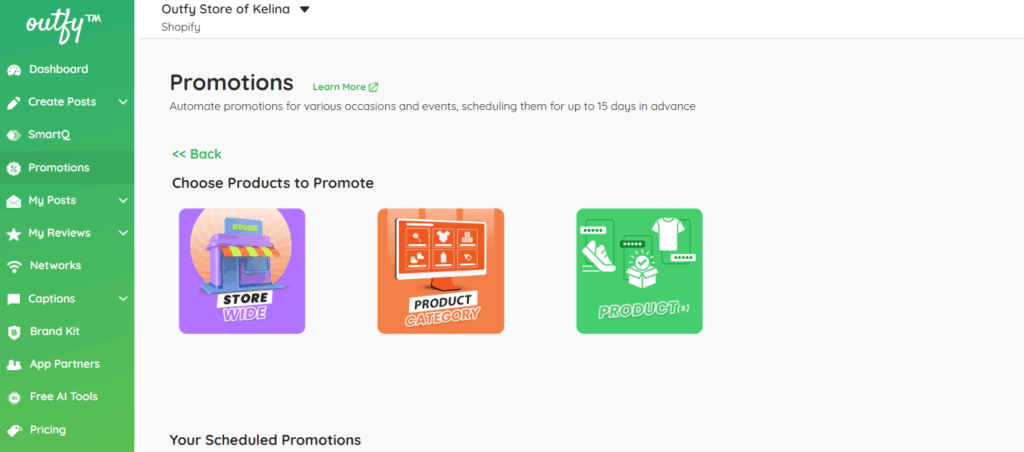
1. Store Wide
Promote your entire store—all your products will be included.
2. Product Category
Promote only specific categories, such as Beachwear, Summer Accessories, or Outdoor Gear.
3. Specific Products
Manually pick products, such as bestsellers, new arrivals, or discounted items.
Just select the option that best fits your promotion, then choose the products or categories you want to include.
Add Promotion Detail #
After selecting your store, category, or products, add a promotion to personalize your campaign for a stronger impact and better engagement.
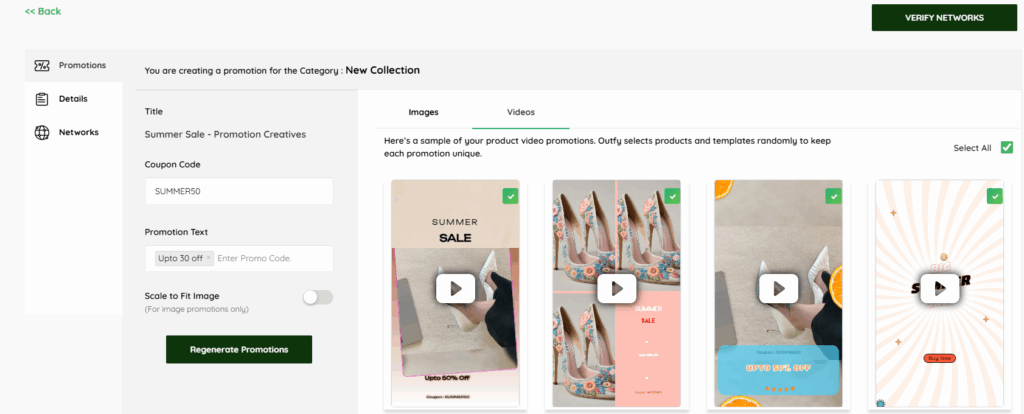
1. Promotion Title
Internal name for your promotion, such as Summer Sale – Promotion Creatives will be written already.
2. Add a Coupon Code (Optional)
This field is where you can manually enter any discount code you want to promote.
- It must match exactly with what you’ve set up in your store platform (e.g., Shopify, WooCommerce).
- If you’re not offering a discount code, you can leave it blank.
Example Codes:
- SUMMER50
- HOTDEAL25
- FREESHIP
- NEWCOLLECTION20
Note: Outfy doesn’t auto-fetch codes from your store, so be sure the code you type here is valid.
3. Write a Promotion Text
This is the attention-grabbing message your audience will see in your videos and images. It appears on the creatives (as shown in your image) and plays a key role in engagement.
Keep it:
- Short and exciting
- Clear about the offer
- Aligned with the seasonal theme
Suggested Text for Summer Sale:
- Up to 50% Off Now!
- Hot Summer Deals!
Stay cool and stylish with our fresh arrivals—limited time only.
Note: This text cannot exceed 24 characters
4. Scale to Fit Image (Toggle)
Turn this ON to make sure all product images are properly sized within promotional templates.
Especially helpful for platforms like Instagram, Pinterest, and Facebook.
5. Click “Regenerate Promotions” (Optional)
If you want to update the creatives (images/videos) based on your latest Title, Promo Text, and Code, click this.
Otherwise, you can move ahead with the current previews.
Set Duration and Time #
This section helps you control when, how often, and what time your promotional content will be posted on your social media accounts.
1. Promotion Name
Example: Promotion for summer-Aug 05 2025
This is only visible to you, not your customers.
It’s useful to keep track of your campaigns.
2. Start Date
This is when your promotion will begin.
Choose the date you want Outfy to start posting your Summer Sale content.
Example: 2025-8-5
Tip: Plan ahead. Set the date a few days before your sale actually goes live to start building excitement.
3. Duration (Days)
Select how many days you want your promotion to run.
You can choose between 1 and 15 days.
Example: If you want it to last 5 days, select 5 from the dropdown option.
Tip: 5–7 days is ideal for a seasonal sale like Summer Sale.
4. Posts / Network / Day
Set how many times per day you want to post on each social media platform.
Example:
- If you choose
1, Outfy will post once per platform per day. - You can increase this to
2if you want more frequent exposure.
5. Select Day(s) of the Week to Post
Choose which days of the week your promotion will run.
All 7 days (Mon–Sun) are selected by default.
If your audience is active every day, keep all days selected.
If weekends are slow for your brand, deselect Saturday and Sunday.
6. Select Posting Time
This determines when your posts will be published per day.
a) Product Type
Select what kind of products to promote:
- Select the Latest products option to show newly added products from your store.
- Choose Latest & Random to feature a mix of new arrivals and varied products for a fresh, dynamic feed.
- Use the Random Products option to highlight a wide variety of items from your store without a set order.
b) Time Range
Choose a time window when posts should go live each day. Outfy will automatically post at random times within this window, making it look natural.
Example: From 8:00 hours to 24:00 hours.
c) Timezone
Ensure the timezone matches your audience or store location.
Example:( GMT-04:00) America? New York.
7. Use Store Logo (Toggle ON)
When this is ON, Outfy will automatically add your store’s logo to each image or video creative.
This is great for branding and increasing recognition.
8. Use AI to Auto Generate Captions and Hashtags
Outfy’s AI will automatically write catchy captions and include relevant hashtags.
When enabled, the AI will use your:
- Promotion type (e.g., Flash Sale, Summer Sale)
- Coupon code (if added)
- Product details
The generated captions include:
- Emojis for visual impact
- Relevant hashtags
- A call to action like “Shop Now”
Note: If you change the promotion text or coupon code, you may need to regenerate the caption manually or edit it.
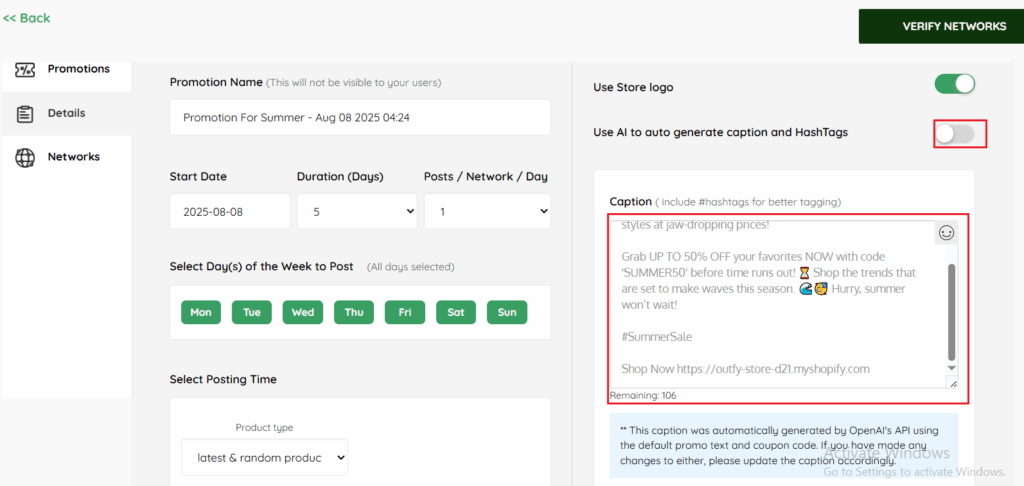
When AI Captions and Hashtags Are Turned Off/Disabled:
You’ll see a suggested AI caption here that you can review and edit freely. You can also:
- Write your own custom caption
- Add your own emojis, hashtags, and call-to-action text
Want to post in another language?
No worries — you can switch the language for your captions and hashtags anytime. Just follow this guide to change the post language, and it will update automatically here.
Select Social Networks #
This step lets you decide where your promotion will be shared.

Use the ON/OFF toggle to enable or disable each platform connected to your account.
For each enabled platform, you may need to select a specific page, account, board, or section using the dropdown menus.
You can choose to post on just one platform or multiple platforms simultaneously, depending on your promotion strategy.
Create the Promotion #
After selecting the networks and fill the all the necessary details.
- Review all your selections.
- Click the Create Promotion button (top right).
- Your Summer Sale campaign is now scheduled and will run automatically across your social channels
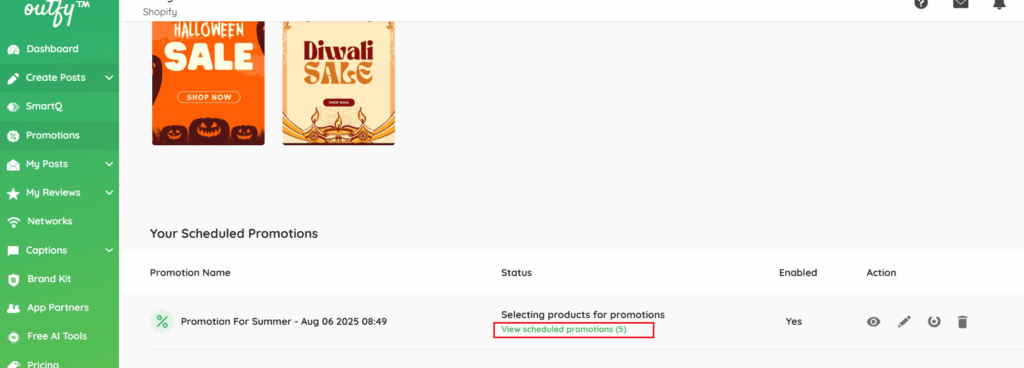
You can view and manage your upcoming promotions by clicking “View Scheduled Promotions.”
Review Promotion #
By clicking on the view schedule promotion, you will be redirected to the “schedule page” under “My Post” tab.
Click Promotion images or Promotion videos to check the schedule promotions.
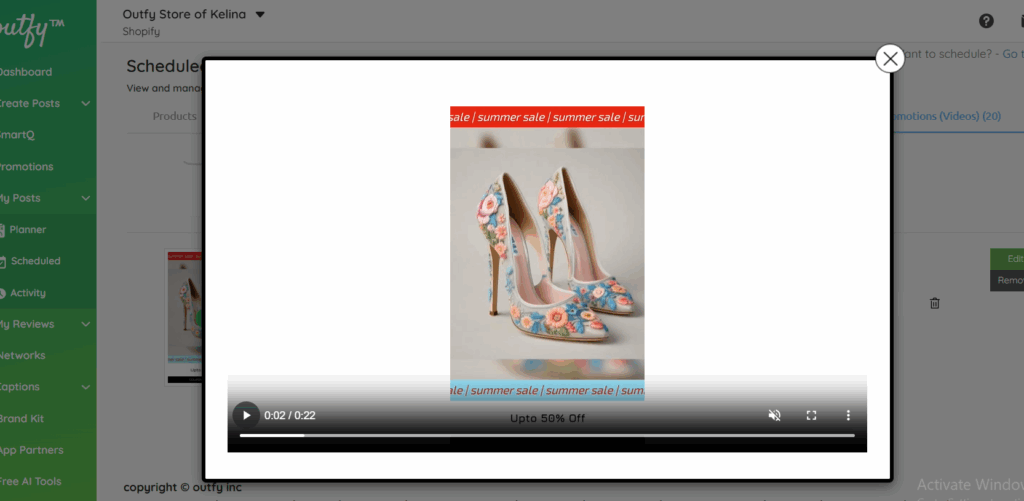
Take a moment to preview your eye-catching promotion — designed to grab attention and scheduled to go live exactly when you want it.”
Click on play button to review the video.
Note: Don’t worry if your promotion video takes a little longer to finish processing — this is completely normal!
Videos go through a few extra steps behind the scenes, but rest assured, everything will be completed shortly and your promotion will go live as scheduled.