Promotions are a great way to highlight special occasions, launch products, or boost visibility across your social and marketplace channels. This guide walks you through the step-by-step process to create an engaging and effective promotion on Outfy. To learn more check this guide.
What is a Promotion? #
A Promotion in Outfy allows you to schedule and share themed posts automatically across your social media accounts. Promotions can be set up for:
- Special occasions (e.g., Halloween, Canada Day, Summer Sale)
- Sales events (e.g., Flash Sale, Clearance, End of Season)
- Product-specific campaigns
Note: You can schedule posts up to 15 days in advance, and Outfy will handle the posting for you. Browse all our sales campaign templates here!
Promotion Theme or Occasion Types #
Start by choosing a promotion theme that best aligns with your campaign goal. From the Promotions section on your Outfy dashboard, you’ll find several categorized themes that help you create visually appealing and seasonally relevant promotions in just a few clicks.
Here’s a closer look at each category:
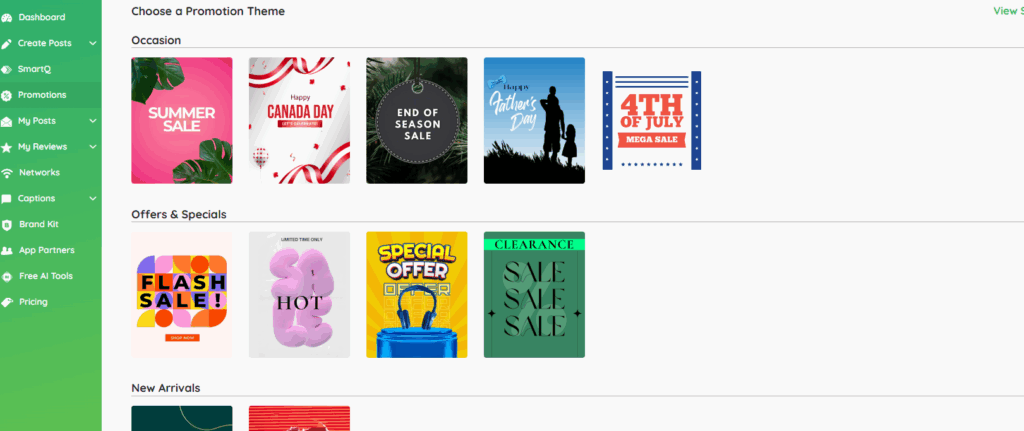
1. Occasion
Occasion-based promotions let you tap into the emotional and cultural pulse of your audience. These themes are great for aligning your brand with key shopping seasons and festivities. Choose any of the occasion themes for your promotion.
Best for:
- Seasonal events, holidays, and global/local celebrations.
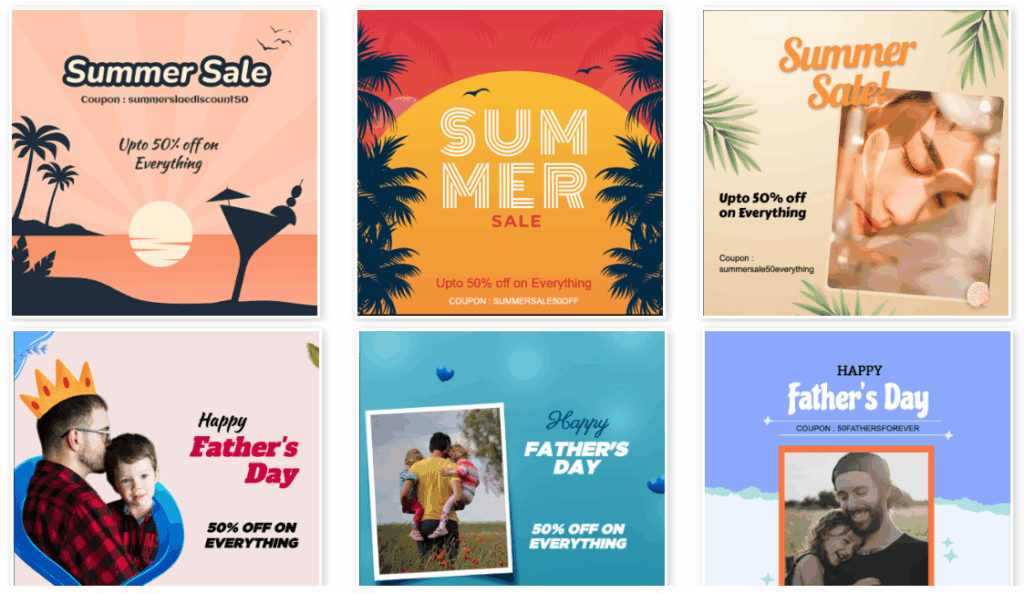
Examples:
- Summer Sale – Promote summer collections, outdoor essentials, or travel-related items.
- Father’s Day – Highlight products that make great gifts for dads, such as gadgets, apparel, or tools.
Tip: These themes often come with matching templates and hashtags to enhance visibility. Learn how to create a Summer Sale promotion
2. Offers & Specials
These themes are focused on time-limited offers, discounts, and exclusive deals. They’re perfect for:
- Clearing out inventory
- Running flash promotions
- Attracting bargain-hunters
Best for:
- Creating urgency and boosting short-term sales.
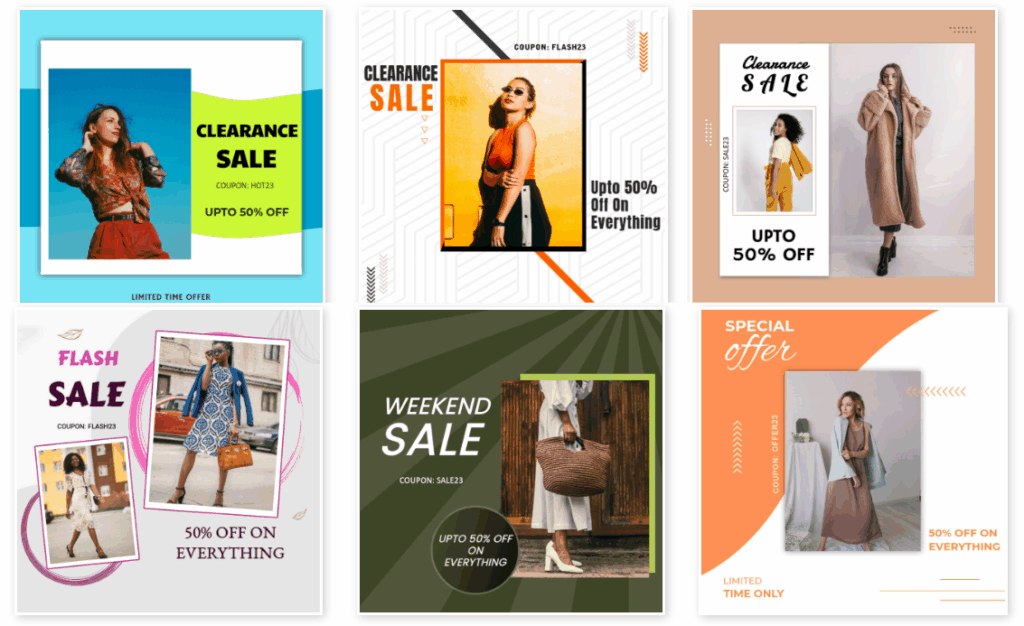
Examples:
- Flash Sale – Generate excitement with a time-sensitive sale lasting just a few hours or a day.
- Clearance – Highlight products with deep discounts to move old or excess stock quickly.
Tip: Pair these with countdowns or urgency-driven captions for best results. Learn how to create a Clearance Sale promotion
3. New Arrivals
If you’ve recently added products to your store or are unveiling a new collection, this is the go-to theme. It helps keep your store looking fresh and encourages return visits from customers.
Best for:
- Showcasing newly launched or restocked products.
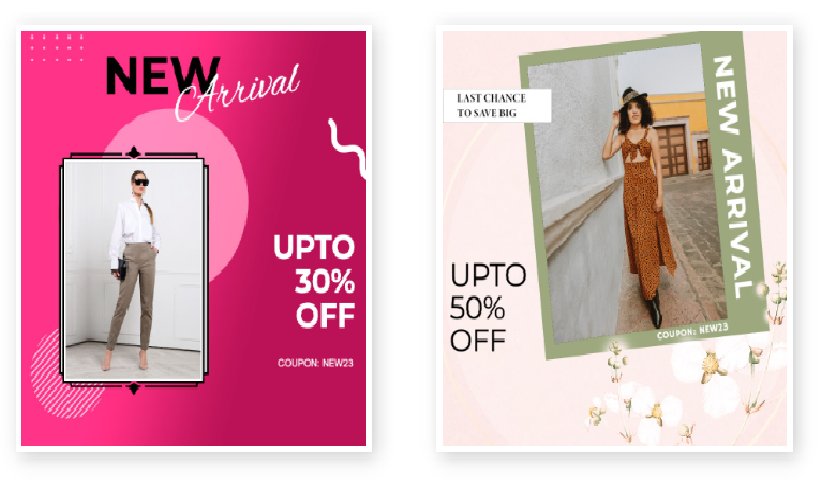
Examples:
- Fresh Arrivals – Great for fashion, accessories, or any seasonal update.
- New Collection – Ideal for announcing restocked popular items.
These promotions work best with high-quality visuals and short descriptions highlighting what’s new.
4. Archive
Some promotions never go out of style, festive sales and global celebrations come around again and again. The Archive category includes timeless, high-impact themes that are relevant every year, helping you quickly create campaigns for popular occasions.
Best for:
- Celebrations and events that happen year after year.
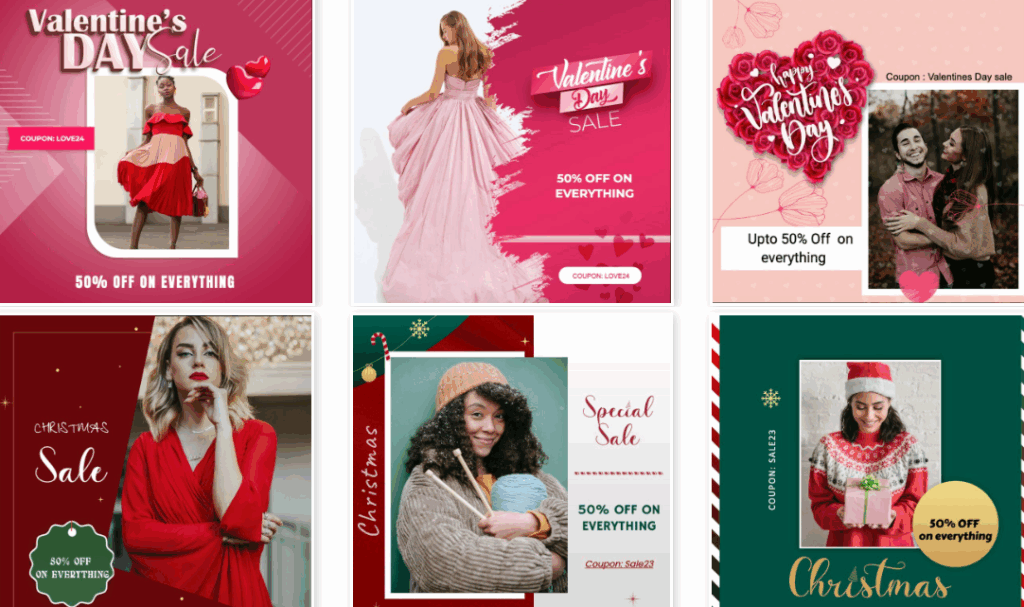
Examples:
- Valentine’s Day – Showcase romantic gifts, couple deals, or themed collections.
- Christmas Sale – Highlight festive discounts, gift ideas, and winter collections.
Tip: These themes are pre-built and ready to use, saving you time during busy seasons. Learn how to create a Black Friday promotion
Run Promotion on Store, Category, or Specific Products #
Easily run targeted promotions across your entire store, specific product categories, or individual best-sellers. Customize your Promotion campaign for maximum impact and flexibility. Choose what to promote:
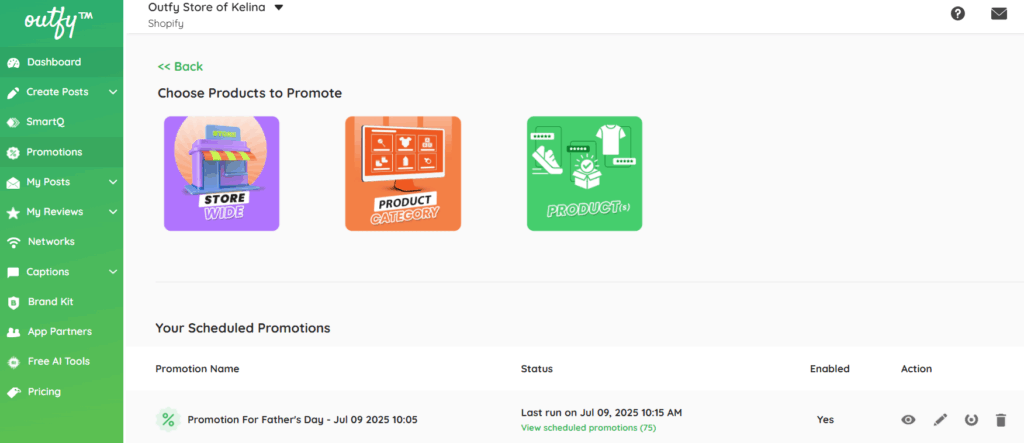
1. Store Wide
Includes all products. Promote all products in your store—ideal for general sales or site-wide discounts.
2. Product Category
Select categories or collections like Clothing, Accessories, etc to target niche audience.
3. Specific Products
Manually pick items like bestsellers, new arrivals, or clearance stock for focused campaigns.
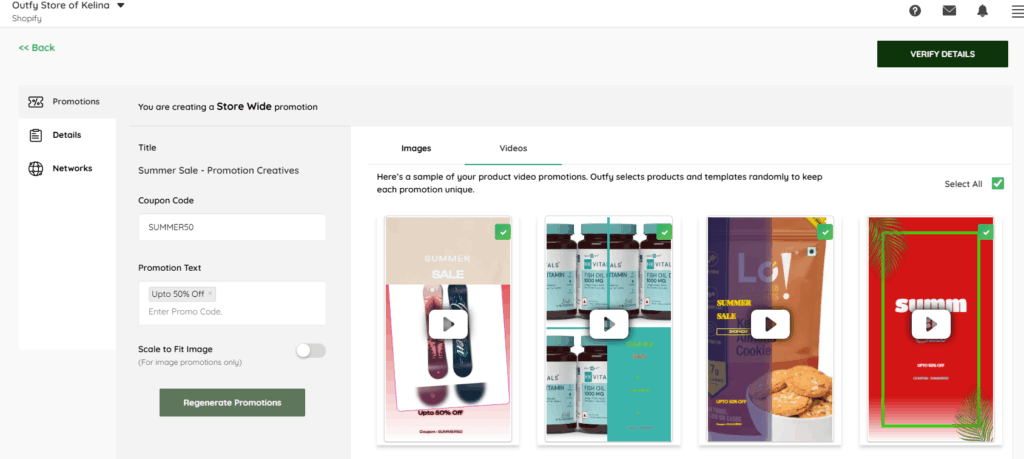
Add Basic Promotion Details #
After choosing the product you want to promote, Now add your promotion details:
1. Promotion Title
Choose from various pre-set promo titles like Flash Sale, Hot Sale, Daily Sale, or Special Offer. It is just for your reference, your audience won’t see it.
2. Coupon Code
If you’re offering a discount code that customers can use at checkout, enter it here manually. This field is not connected to your Shopify or store platform, so any coupon codes you’ve created there will not appear automatically. You’ll need to manually enter the exact code you want to promote.
Examples:
- SAVE20
- FREESHIP
- WELCOME10
This field is not connected to your Shopify or store platform, so any coupon codes you’ve created there will not appear automatically. You’ll need to manually enter the exact code you want to promote.
Note: If you don’t have a code, you can leave this blank.
3. Promotion Text
This is the headline your audience will see. It’s what grabs attention!
Examples include:
- Up to 50% Off”
- “Buy One, Get One Free”
- “Limited Time Offer – Ends Soon!”
- “Free Shipping on All Orders”
Try to keep it short, exciting, and clear. It helps increase engagement and clicks on your promotion posts.(e.g., “Up to 50% Off”)
4. Scale to fit images
The image resizes proportionally, possibly adding padding or adjusting placement to ensure the entire product is visible and centered in the template.
5. Click “Regenerate Promotions” (Optional)
If you want to update the creatives (images/videos) based on your latest Title, Promo Text, and Code, click this.
Select Promo Images and Videos #
Outfy automatically creates promo images and videos using your selected products and ready-made templates.

- Preview each creative to see how it looks
- Select or deselect the ones you want to use
- Click “Select All” if you want to use everything
Tip: You don’t need to design anything—just pick the visuals that best match your promotion. Start with a few, and you can always add more later.
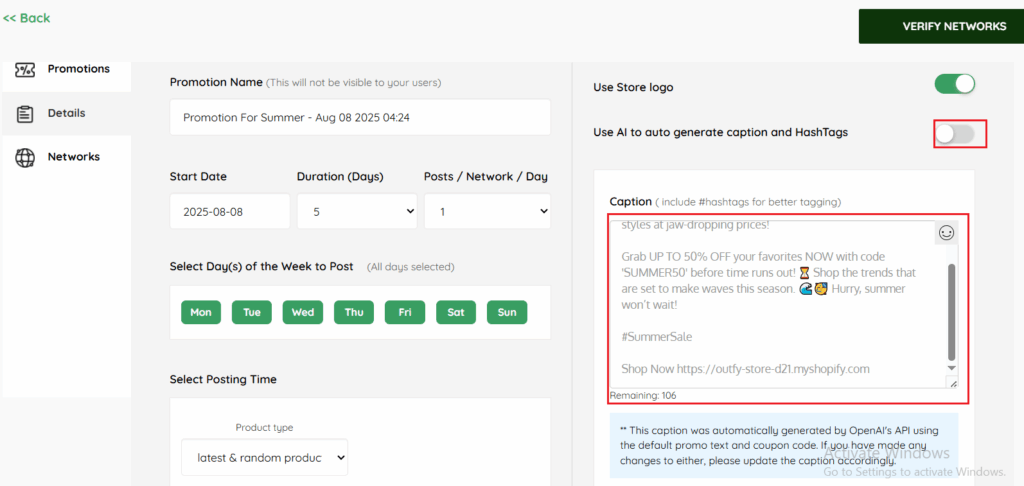
Set Duration and Time #
After filling in the promotion details, Next, duration and time details, Configure when and how often your promotion posts:

1. Promotion Name
This promotion name is Internal and for your easy campaign tracking.
Example: Promotion for summer sale-Aug 05 2025
2. Start Date
This is where you select when your promotion should begin.
Simply click on the date field to open a calendar and choose your preferred start date. This marks Day 1 of your campaign.
3. Duration (Days)
This lets you decide how long your promotion will run.
From the dropdown, you can choose any number of days—up to a maximum of 15 days.
Whether you want a short 3-day campaign or a full 2-week push, just pick what works best for your strategy.
4. Posts/Network/Day
This setting allows you to control how many posts will be published per social network each day during the promotion.
You can select between 1 or more posts (ideal is 1–2 per day) depending on how frequently you want to engage your audience.
5. Select Day(s) of the Week to Post
Here, you can choose which days of the week you want your promotional posts to go live.
By default, all 7 days are selected (Mon–Sun), meaning posts will go out daily.
Want to skip weekends? Just click on Sat and Sun to deselect them. This gives you full control to match your posting schedule with when your audience is most active.
6. Select Posting Time
You can set the time range during which your posts will be published each day.
For example:
- If you choose From 08:00 hrs to 23:00 hrs, Outfy will post at a random time within this range.
This helps your posts go live at the best possible time without being too repetitive.
- You can also see your current timezone (shown as GMT -04:00 America/New York), and if needed, you can change it to match your preferred location. This ensures your posts go out at the correct local time.
7. Store Logo
On the right side of the screen, there’s a toggle to add your store’s logo to each promotional image.
Turn this on if you’d like to brand your posts with your logo—great for brand recognition!
8. AI Caption and Hashtags
Enable this option to let AI automatically write engaging captions and hashtags for your promotional posts.
Here’s what happens when it’s Enabled:
Captions are based on your:
- Promotion type (e.g., Flash Sale, Summer Sale)
- Coupon code (if entered)
- Product details
The generated text includes:
- Emojis to boost visual engagement
- Hashtags relevant to your campaign
- A call to action like “Shop Now”
Note: If you change the promotion text or coupon code, you may need to regenerate the caption manually or edit it.
When AI Captions and Hashtags Are Disabled:
The AI-generated captions are displayed here, ready for you to review and edit as needed. Here’s what you can do:
- Write your own custom caption exactly how you want it.
- Add your own emojis, hashtags, and call-to-action phrases.
Want to Post in a Different Language?
No problem! You can change the language of your captions and hashtags, whether you’re using AI or writing your own.
Check this guide on how to change the post language. Once the language is changed, it applies automatically to the promotional captions here too.
Select Social Accounts #
The Networks tab is where you choose which social media accounts you’d like your promotional content to be shared on. It gives you full flexibility to control where and how your posts appear across platforms.
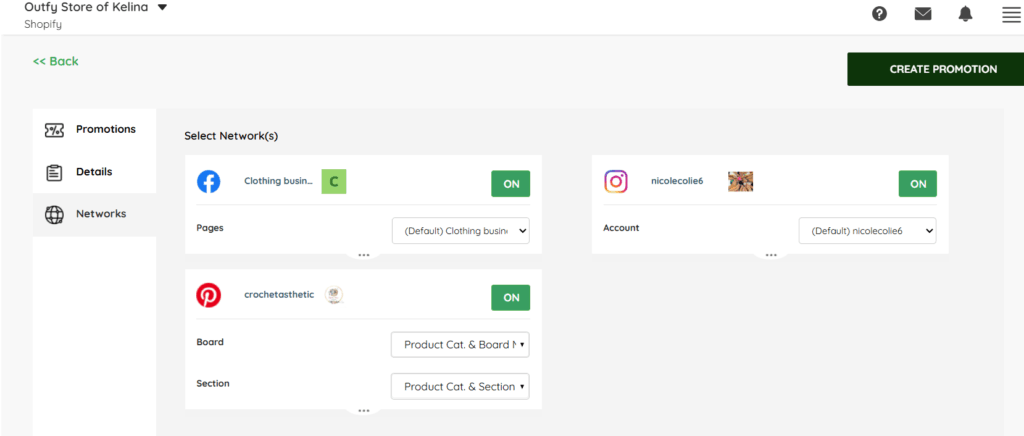
1. Enable or Disable Each Network
Each network card (like Facebook, YouTube, Instagram, Pinterest) has an ON/OFF toggle in the top-right corner.
If it’s turned ON, your promotional content will be posted on that platform.
If you don’t want to use a platform for a specific promotion, just switch it OFF.
2. Customize settings
For each network depending on the platform’s options. For example, you might be able to select:
- A specific page, profile, or channel
- A board or section (for platforms that organize content this way)
- Content visibility or category settings (if available)
3. Choose from available accounts or pages
linked to your Outfy account. If you have multiple profiles or business pages connected, you can select the most appropriate one for the promotion.
Create Promotion #
Once everything looks good, click “Create Promotion”. Your promotion will run automatically according to the schedule and settings you configured.
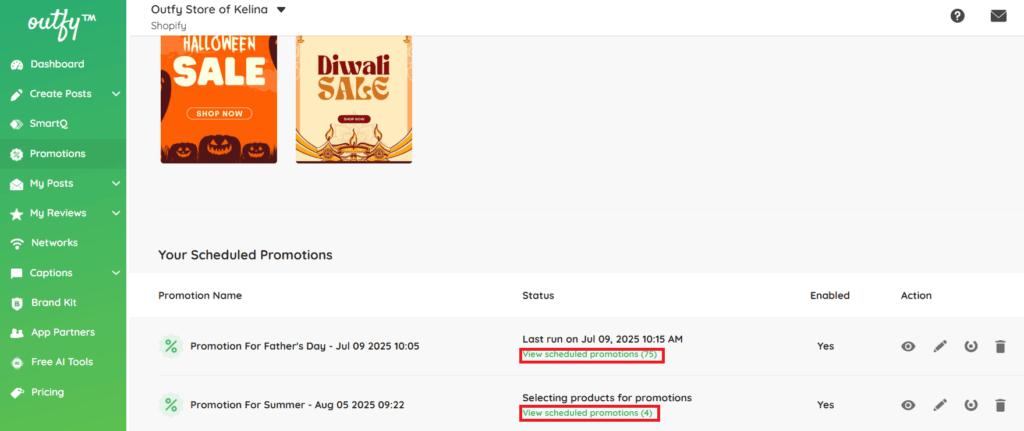
You can view and manage your upcoming promotions by clicking “View Scheduled Promotions”.
Frequently Asked Questions #
1. How far in advance can I schedule a promotion?
You can schedule promotions up to 15 days in advance. Each promotion can run for a maximum of 15 days.
2. What types of promotions can I create on Outfy?
You can create promotions based on:
- Occasions (e.g., Halloween, Summer Sale)
- Offers & Specials (e.g., Flash Sale, Clearance)
- New Arrivals (e.g., Fresh Launches)
- Archive Themes (e.g., Valentine’s Day, Christmas)
Each theme comes with pre-designed templates and captions to match the promotion type.
3. Can I promote specific products or collections only?
Yes! You can choose to promote:
- Your entire store
- Specific product categories
- Individual products
This gives you flexibility to run focused or broad campaigns.
4. Do I need to design promotional images or videos?
No. Outfy automatically generates promotional creatives using your selected products and pre-designed templates. You can preview, select, or regenerate these before launching your promotion.
5. Can I customize the promotion text and coupon code?
Yes. You can:
- Add your own headline text (e.g., “Up to 50% Off”)
- Enter a custom coupon code (e.g., FREESHIP)
Note: The coupon code must be manually entered and should match what’s available on your store—Outfy does not sync with your store’s coupons.
6. How does the AI caption and hashtag feature work?
When enabled, Outfy’s AI generates:
- Captions relevant to your promotion type and products
- Hashtags to boost post visibility
- Emojis and styling to enhance engagement
You can always disable this and write your own custom captions.