Introduction #
Connecting your Pinterest account to Outfy allows you to create and schedule pins effortlessly across boards. This integration helps you maintain a consistent visual presence and reach Pinterest users without manual uploads.
Note: You must have a Pinterest Business account and authorize Outfy with the required permissions to publish on your behalf.
Prerequisites #
Before you begin, ensure the following:
- You have a Pinterest Business account
Outfy only works with Business accounts. If you’re using a personal Pinterest account, convert it to a Business account from Pinterest settings. - You’re signed into the correct Pinterest account
Log in to the Pinterest Business account you want to connect. Using the wrong account will result in failed access. - Your account is in good standing
Accounts that are restricted or flagged by Pinterest may block third-party publishing access. Make sure your account complies with Pinterest’s Community Guidelines. - You’re using a desktop browser with pop-up blockers disabled
Outfy’s Pinterest connection opens in a separate window. Disable any pop-up blockers or browser extensions that might interfere with the process.
Steps to Connect Pinterest to Outfy #
Step 1: Log in to Outfy
Visit outfy.com and log in to your account.
Step 2: Go to the Networks Page
Click on Networks from the left-hand menu.
Step 3: Select the Pinterest Tab
Click on the Pinterest tab.
Step 4: Click “Add Pinterest Account”
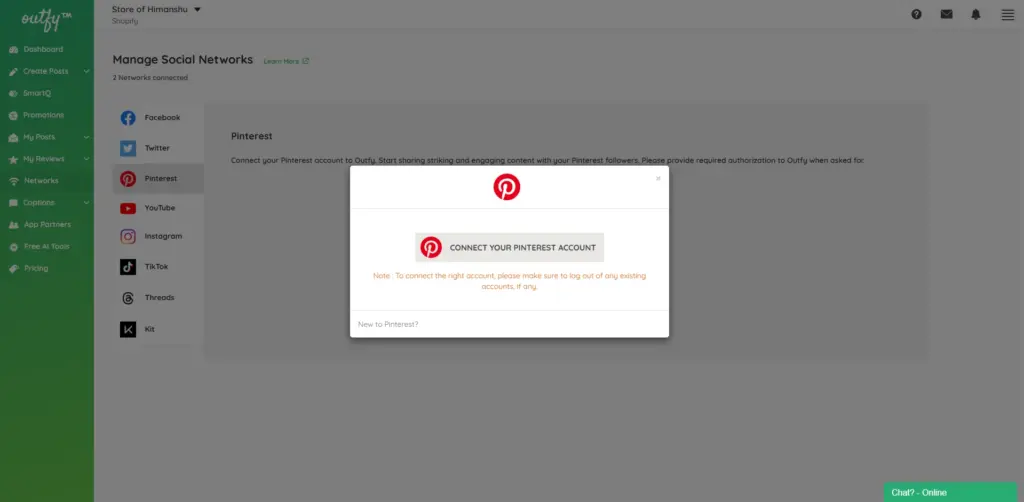
A window will pop up titled “Connect your Pinterest account.” Click the button to begin the connection.
Step 5: Grant Permissions
You’ll be redirected to Pinterest’s login screen (if you’re not already signed in).
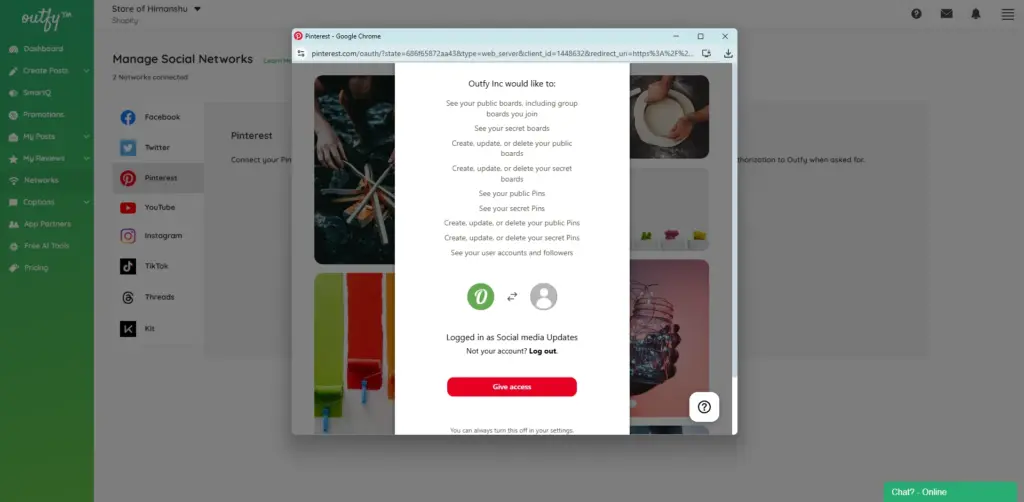
Authorize Outfy to access and manage your Pinterest content by clicking Give Access.
Step 6: Pick a Board and Section
After granting permissions, you’ll be prompted to choose a default board and, if applicable, a section within that board for posting.
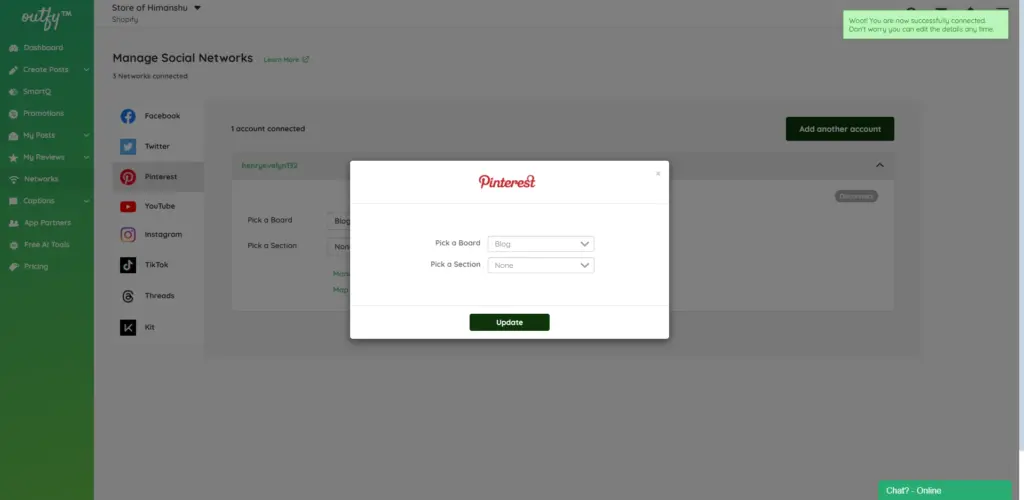
- Use the dropdown menu to select a board where your posts will go by default.
- If the board has sections, select a section as well.
- Click Update to confirm.
Step 7: Finish
Once you click Update, your Pinterest account will be successfully connected to Outfy.
It will now appear under the Pinterest section on your Networks page.
You can now create and schedule pins directly from Outfy.
Troubleshooting #
1. Pinterest Page Not Showing Up
You may be using a personal Pinterest account instead of a Business account.
Solution: Convert your Pinterest to a Business account and try again.
2. Pop-up Window Not Appearing
Browser pop-up blockers might be preventing the Pinterest login screen from loading.
Solution: Disable pop-up blockers and refresh the page.
3. Connected the Wrong Account
If you connected the wrong Pinterest account:
- Go to your Pinterest Settings > Authorized Apps
- Find Outfy and click Remove Access
- Go back to Outfy, disconnect Pinterest, and repeat the connection with the correct account
4. Scheduled Pin Not Posting
Check that:
- The Pinterest account is still connected
- You’ve selected a valid board during post creation
- All required pin details (image, title, description, link) are filled in
FAQs #
1. Can I use a personal Pinterest account with Outfy?
No. Outfy only supports Pinterest Business accounts.
2. Do I need to create boards before connecting?
Yes. Your Pinterest boards must exist already, as Outfy requires you to select a board when publishing a pin.
3. Can I connect multiple Pinterest accounts?
Yes, but each Pinterest Business account must be added separately.
4. Why does it ask for login if I’m already signed into Pinterest?
Outfy uses Pinterest’s official API to request permission. Even if you’re logged in, the system needs you to authorize access for security.