Primary Settings
Select Categories
Here is where you decide which product category or categories you want to use. The pull down menu lists your options.

SmartQ is a tool that helps you automate creation and sharing of Product, Collage and Videos on social media networks.
When you signup, Outfy creates a default SmartQ for you. It is there to familiarise you with SmartQ. It runs daily so that you get acquainted with it’s smartness and intelligence of auto creation & posting. You may turn it off anytime you wish to.
When you log in, you will find SmartQ to your left. The screencap shows you exactly where.

The SmartQ list shows you your existing SmartQ tasks. The SmartQs you add or remove are reflected in this list. You can edit or delete your SmartQs on this list.

The SmartQ status shows you if your SmartQ is ON or OFF. Press the button to do or undo the needful.

The button to the right of your screen is to get you started on creating your own SmartQ.

Here is where you name your SmartQ. A relevant name helps. For example: Morning Collage. Note: Please do not enter special characters in the name like apostrophe, exclamation, comma, full stop, etc.

Here is where you set your post counts. You can post up to three of each kind of content per day. For example, one Collage, one Long video, one Classic Video, one Product.

Here is where you set your schedule the products you want to use to create content around. You can tell SmartQ to choose products randomly or otherwise.
You can specify the time range; between which you want your postings to go to your social media.
For example, if you can instruct SmartQ to post only between 9am to 9pm (which is 21:00 hours in 24 hours format), SmartQ will schedule your postings only between 9am to 9pm only.
Outfy shows your default time zone from your profile. You can change the time zone for your postings as well.
For example - your time zone is EST-New York, but you want your postings to go between 2pm and 4pm PST – LA time, you can tell SmartQ to do this.
Note: Between Time works on 24 hours time format. 1pm equals 13:00 hrs and 12am is 24:00 hrs.
The screencap shows you your options.

Use Outfy’s most powerful feature - AI generated captions and hashtags for your posts. These captions are generated using OpenAI’s services - the industry leader in artificial intelligence.
Customize how your captions are created by setting the following options:

Additionally, you can add up to 5 custom hashtags tailored to your brand.
Custom hints - serve as suggestions to help the AI craft more relevant captions. You can also enable the Product Category hint to ensure the caption aligns more accurately with your product and brand.
If you are not using AI powered captions, you can use the regular templates for generating captions.
Templates
We have a separate Templates Guide to help you understand Templates fully.
For Templates, you can define which caption template you want to use. You can either select a template OR ask SmartQ to choose randomly from your defined caption templates.
Use a particular template if you want all your post templates to have a single type of caption
Use random templates if you have created more than one template and you want SmartQ to choose randomly among them.

Outfy allows you to create multiple hashtag clouds to use in postings. A hashtag cloud is a group of similar hashtags that could be related to your product, category or store. There is a separate user guide for how to set up and manage hashtag clouds. In this setting, you can tell SnartQ how to use your hashtags.
You can choose which hashtag cloud SmartQ will select hashtags to add to your postings. In hashtag clouds, there is a way to map your hashtag clouds with your product categories. You can use that mapping. In this case, SmartQ will pick the hashtags from the correct board, based on the category of the product.
If your product is in more than one category, SmartQ can choose the hashtags from any category randomly.
Here is where you decide which product category or categories you want to use. The pull down menu lists your options.
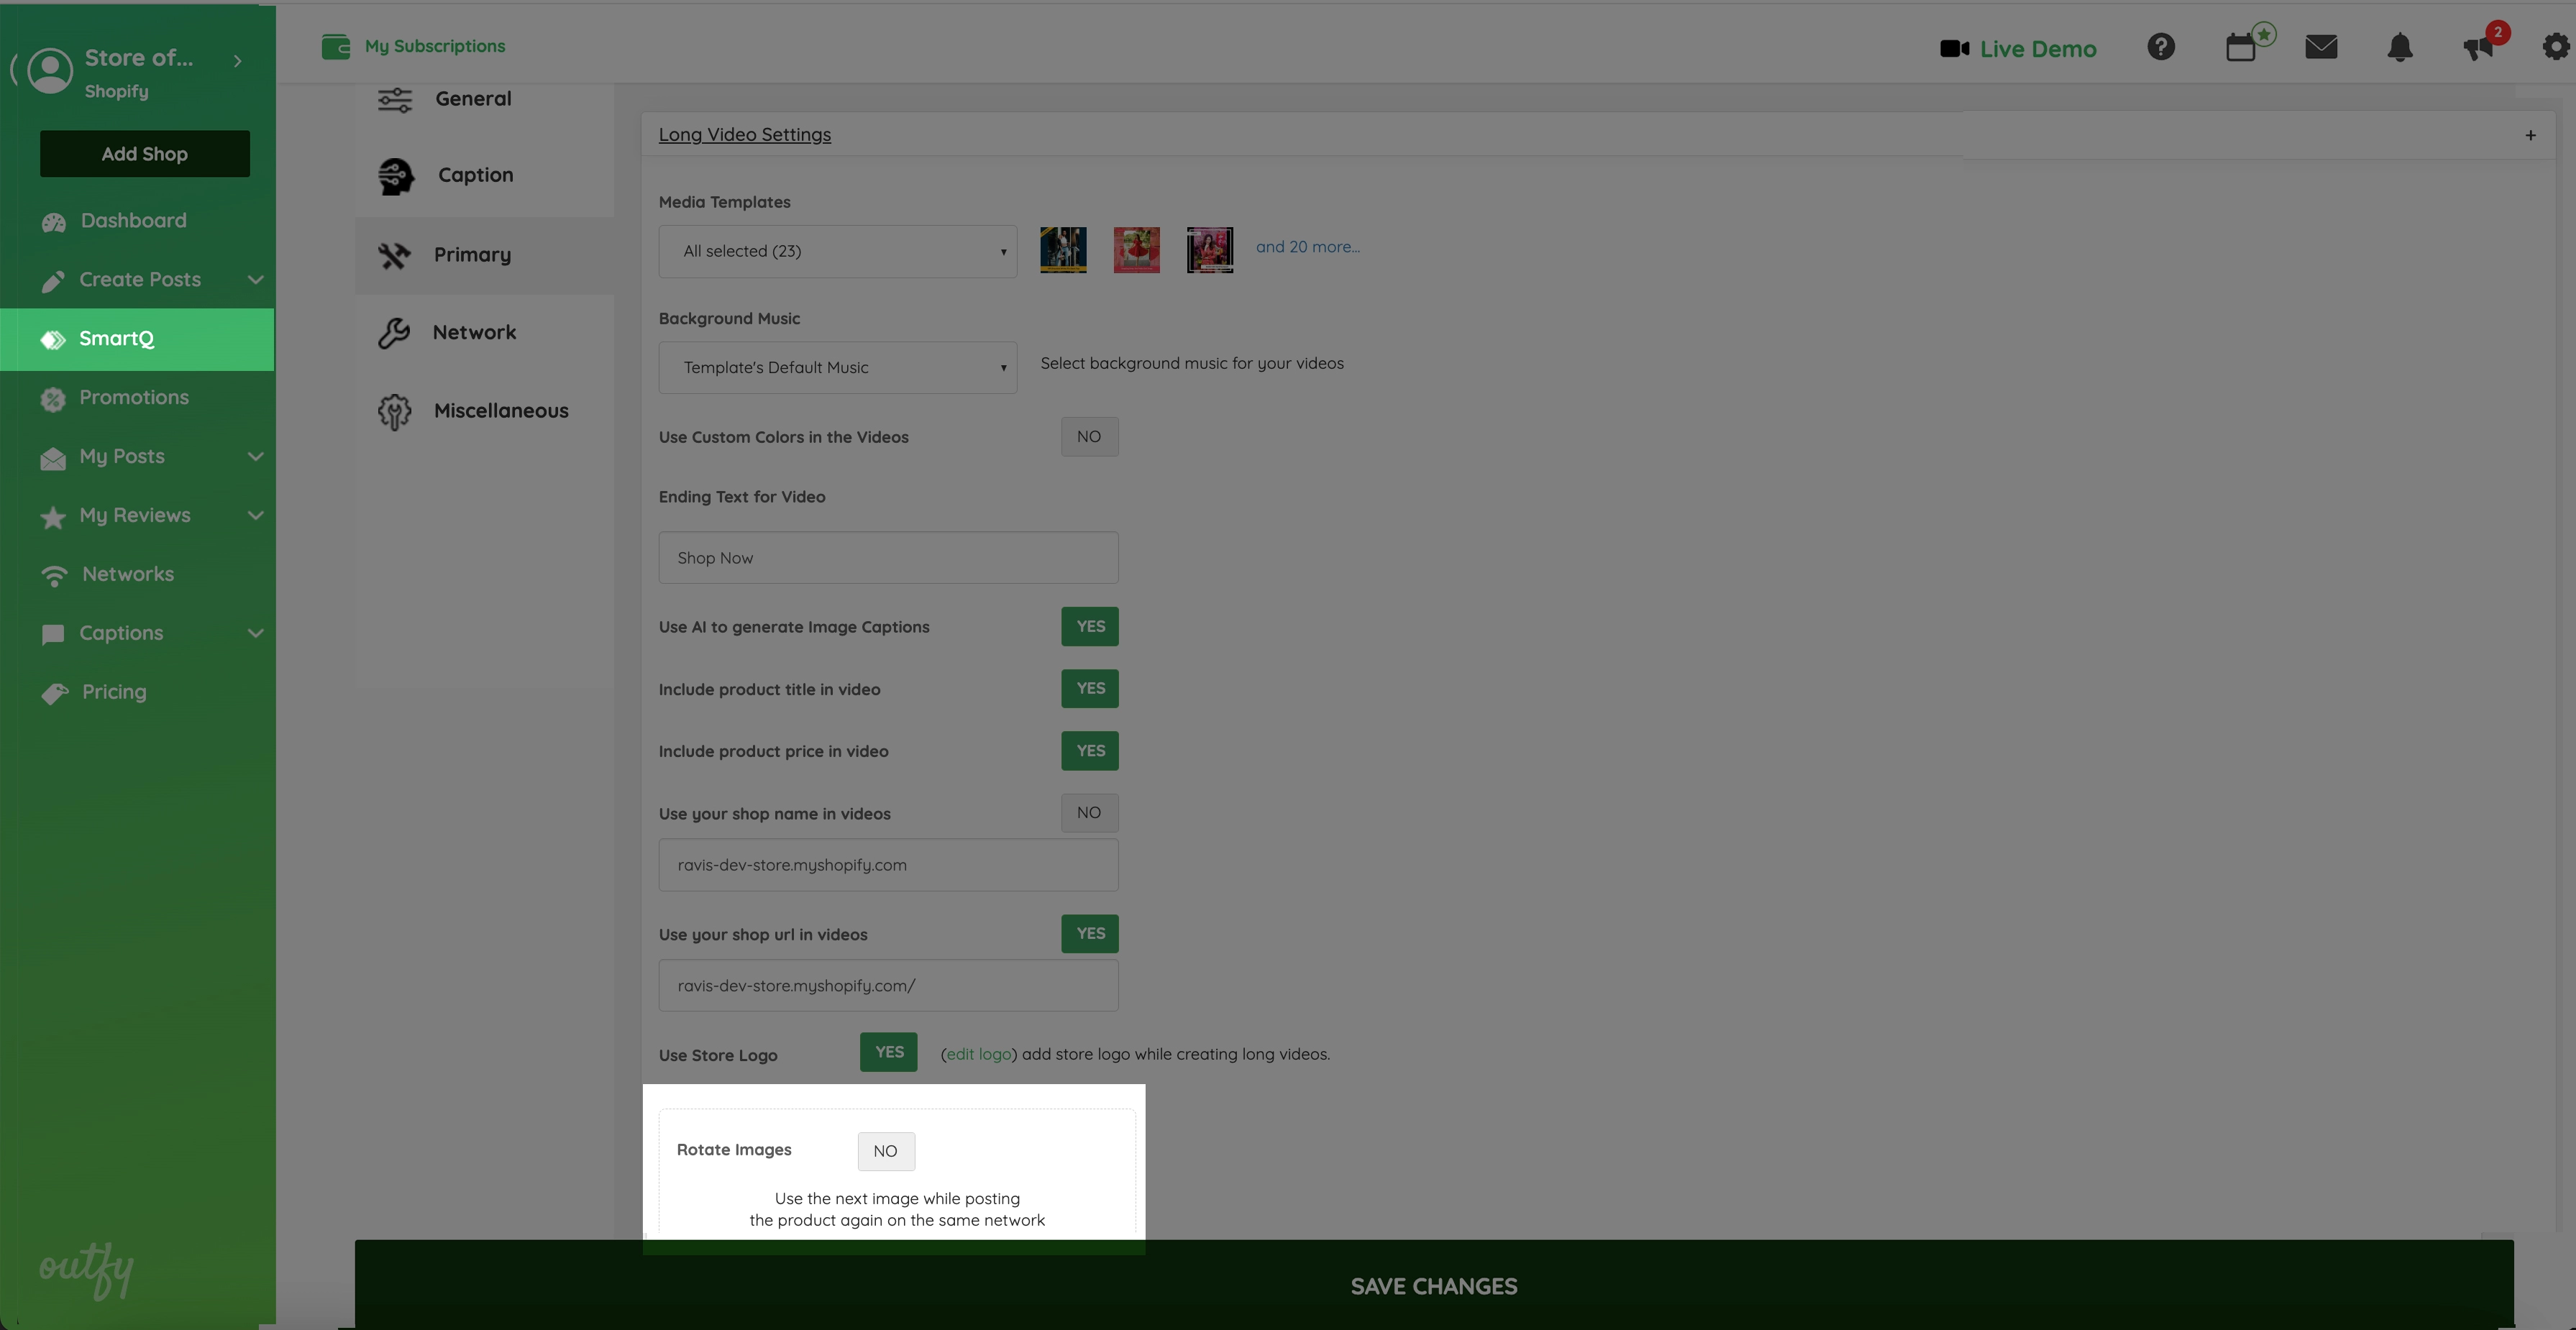
Here is where you decide which video template you want to use. The pull down menu shows you your options.

Here is where you decide which music you want to use. The pull down menu shows you your options.

Turn this ON if you want to change the default video colors and set them according to your brand. In each video, a set of 5 colors are used. You can change any or all of the colors.
Each video is accompanied by an ending text which acts as the CTA (call to action). By default, it is set to "Shop Now" for videos. You can change it to something else like "Buy Now" or "Get it Today".
Turn this option ON to get some amazing and dynamic captions in your videos. These video captions are generated from your product title and description.

Here is where you put in the name and url of your store. The screencap shows you this exactly.

Here is the button you press to decide whether or not you want your logo to appear.
![]()
Here is where you decide whether or not you want your products to be repeated when you post again on the same network.

Here is where you decide which video template you want to use. The pull down menu shows you your options. You can choose square (1:1) templates suitable for Facebook, Instagram and Twitter or the Youtube format (9:16).

Here is where you decide which music you want to use. The pull down menu shows you your options.

Turn this ON if you want to change the default video colors and set them according to your brand. In each video, a set of 5 colors are used. You can change any or all of the colors.
Each video is accompanied by an ending text which acts as the CTA (call to action). By default, it is set to "Shop Now" for videos. You can change it to something else like "Buy Now" or "Get it Today".
Turn this option ON to get some amazing and dynamic captions in your videos. These video captions are generated from your product title and description.
At times, you may not want to show your product titles or the prices in your videos. Turn off the options for each accordingly.

Here is where you put in the name and url of your store. The screencap shows you this exactly.

Here is the button you press to decide whether or not you want your logo to appear.
![]()
Here is where you decide whether or not you want your products to be repeated when you post again on the same network.
Here is where you decide the background for your Classic Video.

Here is where you decide the sticker or stickers for your Classic Video.

Choose a resolution which fits best for your Classic Videos: - 1080 x 1350 px - 540 x 675 px

Here is where you decide how many product images in your Classic Video and whether or not your want the images to be shuffled in the animation.
![]()
Here is where you decide whether or not you want to add your store logo to your Classic Video.

Here is where you decide whether or not you want your collage to have frames. The pull down menu shows you your options.

Here is where you decide the sticker or stickers for your Collage.

Here is where you decide whether or not you want and where to add your store logo to your Collage.
![]()
Here is where you decide whether or not you want your products to be repeated when you post again on the same network.

Here is where you decide whether or not you want your products to be repeated when you post again on the same network.

In this section, you let SmartQ know which social media networks you want your content to be posted on. Choose the button next to each network to ON or OFF.

In this section of SmartQ, you let SmartQ know whether or not you want content to be shared on social media networks on weekends. Also, whether or not to repeat SmartQ once every product has been shared.

Don't forget to save the instructions or you will have to do them all over again!


