
How to Schedule a Post on Facebook (2026)
Last Updated on December 31, 2025 by Himanshu Rawat
If you want to stay active on Facebook without constantly being online, scheduling posts is the perfect solution. It allows you to plan your content in advance, stay consistent, and engage your audience at the right time—even when you’re busy.
In this guide, we’ll show you how to schedule a post on Facebook step by step. Whether you’re using a mobile device, desktop, or a tool like Outfy (designed especially for small businesses), you’ll learn all the methods to save time and keep your Facebook page active effortlessly.
Why Schedule Facebook Posts?
Posting on Facebook every day can feel like a lot of work. Some days you might be too busy, and other times you might simply forget. That’s why scheduling posts is so helpful.
Here’s why you should try it:
- Stay consistent: Your page keeps posting even when you’re not online.
- Save time: You can create a bunch of posts at once and schedule them ahead.
- Reach more people: Post at times when your audience is most active.
- Less stress: No more last-minute rush to think of something to share.
When you know how to schedule a post on Facebook, managing your page becomes much easier and way less stressful.
Note: Want to schedule posts on Instagram too? Check here for a complete guide on Instagram post scheduling.
How to Schedule a Post on Facebook in Mobile
You don’t need any extra tools to schedule posts from your phone — you can do it directly through the Facebook app. This makes it super convenient if you’re managing your page on the go. However, keep in mind that the mobile app only allows you to schedule one post at a time — bulk scheduling isn’t available here.
Here’s the step-by-step process:
- Log in to Your Account
Open the Facebook app and go to the profile or Business Page where you want to post. - Create Your Post
Tap Create Post. Add your caption, upload photos, videos, or reels, and then tap Next.

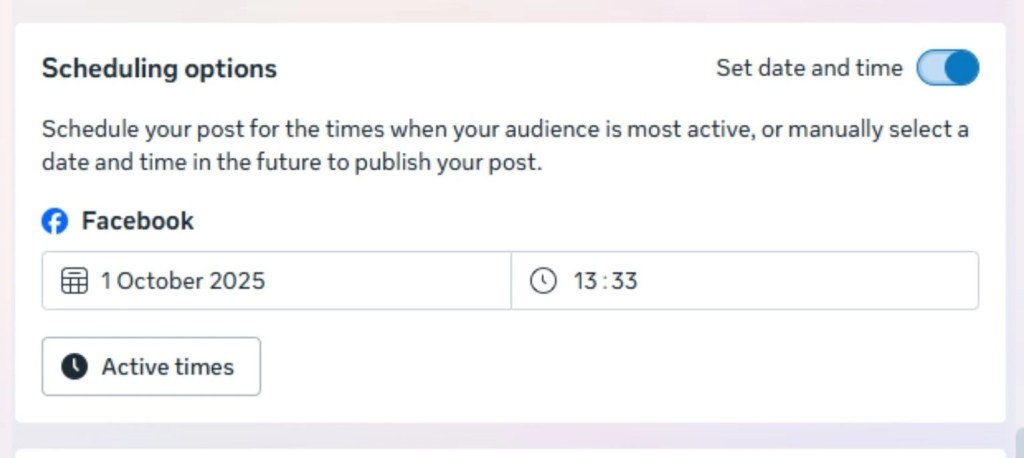
- Set Up Scheduling
After tapping Next, go to the Scheduling options. Choose Schedule for later, then select the exact date and time you’d like the post to publish. - Confirm
Tap Schedule to finish. Your post will now appear under the Planner, where you can view, edit, or reschedule it before it goes live.
Tip: Use the Planner regularly to track, edit, or reschedule your posts before they go live.
How to Schedule a Post on Facebook in Desktop
Scheduling posts from your desktop is ideal for businesses that want to plan multiple posts at once. Using Facebook’s desktop interface via Meta Business Suite, you can schedule single posts or even plan content in bulk.
Here’s how to do it step by step:
- Go to Meta Business Suite
Open Meta Business Suite in your browser and log in. Make sure you’re on the correct Facebook Business Page. - Create Your Post
Click Create Post and add your caption, images, videos, or links. You can preview the post as it will appear on Facebook.
- Schedule the Post
Instead of clicking Publish, select Schedule. Pick the date and time you want the post to go live. - Confirm
Click Schedule Post to finalize. Your post will now appear in the Planner, where you can view, edit, reschedule, or delete it before it publishes.
Tip: Unlike the mobile app, the desktop version allows you to schedule multiple posts at once, which is perfect for planning a week or month of content ahead of time.
How to Find and Edit Scheduled Facebook Posts
After scheduling posts, you may want to review or make changes before they go live. On desktop, this is done through Meta Business Suite:
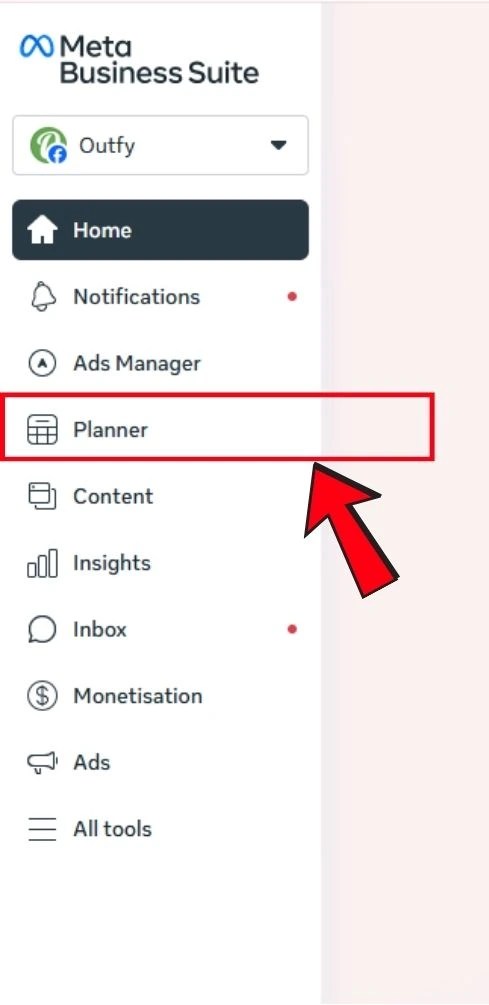
- Go to the Planner tab in Meta Business Suite.
- All your scheduled posts will appear organized by date.
- Click on the post you want to edit.
- Update the caption, images, or scheduled publishing time.
- Click Save to confirm your changes.
Tip: You can only edit posts before they are published. Once a post goes live, you’ll need to create a new post to make changes.
How to Delete a Scheduled Facebook Post
If you need to remove a scheduled post before it goes live, you can do this easily on desktop via Meta Business Suite:
- Go to the Planner tab in Meta Business Suite.
- Locate the post you want to delete from the scheduled list.
- Click on the post to open it, then select More Options (three dots).
- Click Delete and confirm your action.
Tip: Once deleted, a scheduled post cannot be recovered, so double-check before removing it.
How to Schedule a Post on Facebook Using Outfy
Outfy is a powerful tool designed for small businesses and online stores, making it easy to schedule posts on Facebook and other platforms while saving time. You can even bulk schedule posts and automatically generate them from your product images.
Step-by-Step Process
- Login and Connect Your Facebook Page
Sign in to your Outfy account and connect your Facebook Business Page.

- Create a Post
Go to Create Post, then open Your Media to upload images or videos for your post. - Add Content Details
After uploading, add your caption, links, and hashtags, and select Facebook as the platform.

- Schedule the Post
Click Schedule for Later, then pick the date and time you want your post to go live. - Confirm Scheduling
Click Schedule, and Outfy will automatically publish your post at the chosen time.
Why Outfy is Useful for Small Businesses
- Automatic Post Creation: Connect your online store, and Outfy can make posts for you from your product images.
- Bulk Scheduling: Schedule many posts at once to save time.
- All-in-One Management: Manage Facebook and other social media platforms from one dashboard.
Tips for Scheduling Facebook Posts
Scheduling posts can save you time, but following a few simple tips can help you get better results:
- Post at the Right Time
Check when your audience is most active and schedule your posts during those hours. - Mix Different Content
Use images, videos, reels, and links to keep your page interesting. - Plan Ahead
Create a content calendar so you know what to post and when. - Don’t Over-Schedule
Avoid scheduling too far in advance. This keeps your content fresh and relevant. - Use Tools Like Outfy
Tools like Outfy help you schedule posts automatically, create posts from your product images, and even bulk schedule multiple posts.
Tip: Review your scheduled posts regularly to make sure they still match your current promotions or updates.
Start Scheduling Your Facebook Posts Today
Scheduling posts on Facebook helps you save time, keep your page active, and reach your audience when they are most engaged. You can do this using your mobile, desktop, or a tool like Outfy, which is especially helpful for small businesses.
By following this guide, you can easily:
- Schedule posts quickly on mobile or desktop.
- Edit or delete posts before they go live.
- Use Outfy to create posts automatically and even schedule many posts at once.
With scheduled posts, you don’t have to worry about missing important updates, and it becomes much easier to stay consistent and grow your audience.
Frequently Asked Questions (FAQs)
1. Can I schedule my posts on Facebook?
Yes! You can schedule posts on Facebook Business Pages using the Facebook app, desktop (Meta Business Suite), or tools like Outfy. However, you cannot schedule posts on personal profiles.
2. Why can’t I schedule Facebook posts anymore?
If you can’t schedule posts, it may be because you’re trying to do it on a personal profile instead of a Business Page, or there may be a temporary issue with Facebook. Make sure your page has the proper admin or editor access.
3. How do I set up scheduling on Facebook?
On desktop, go to Meta Business Suite, create your post, and select Schedule instead of Publish. On mobile, open the Facebook app, create your post, tap Next, choose Scheduling options, and pick a date and time. Tools like Outfy also let you schedule posts easily.
4. Where is the scheduled post tab on Facebook?
On desktop, your scheduled posts are in the Planner tab of Meta Business Suite. Here you can view, edit, or delete posts before they go live. On mobile, you can find scheduled posts in your Page’s menu under Scheduled Posts.
AI-Powered Social Media Marketing for Online Stores
Automated Viral Reels, Shorts, Videos, Stories, Promotions, Reviews. 5X more engagement and sales